Showing posts with label Recipe Friday. Show all posts

Friday, March 11, 2011

It's Recipe Friday Y'All, Salsa Edition!

I have already established my love for all things avocado so no big surprises that they are an ingredient in this dish.  The main attraction however is this:


Named for it's crimson flesh, the blood orange is one of my favorite citrus fruits (with meyer lemons at the top of the list!). It stains everything in its path and has an almost raspberry like flavor to it.  The dark flesh is produced when the trees are grown in a climate with cool nights.  They are currently in season (December to March for the Texas varieties) and reasonably priced at my local market (bonus points this little puppy has more antioxidants than anyone else in the family...major).  They are so stinking beautiful inside I had to come up with a way to utilize them and because I like a challenge I went for the savory side things.

Savory Blood Orange and Avocado Salsa

What you'll need*: 

*These measurements are approximate, it's a salsa play around with it!

The goods
1 blood orange
1 medium avocado
1/4 C. chopped red onion
2 tsp. minced jalapeno
1 1/2 Tbl. minced cilantro
1 lime, juiced


What to do:

Supreme your orange.  What's that you need a tutorial?  Granted!

Supreme is just a fancy way of saying "wedge that puppy up" but more accurately your end result will be segments of citrus with no rind or pith or membrane.

Cut a small slice off one end of the orange.  You are creating a flat surface for the orange to rest upon while you work
Now ever so carefully round your knife down around the skin to remove the rind and pith (that white fuzzy stuff).  Do this in small segments taking care not to lob off too much flesh in the process. 
Here comes the fun part.  Run your blade between the end of the white membrane separating the segment and the flesh itself.  Repeat on the other side of the segment and it will release itself from the rest of the pack.  
This is what you are aiming for.  Don't worry it takes some practice.  Be careful as you are cutting because you'll be holding the actual fruit in your hand.  This should be a zen experience, focus, don't multi-task when you have the potential to drive said blade straight into the palm of your hand.  Also I recommend working over a bowl while you do this.  No sense in letting all that delicious juice go to waste.  You'll basically be left with the shell of what was once a spherical ball of fruit.  Give it a good squeeze over your work bowl so you don't waste that juicy goodness.

Ok now that that is out of the way...you'll want to dice your avocado.

What?  You want my short cut?  Granted!

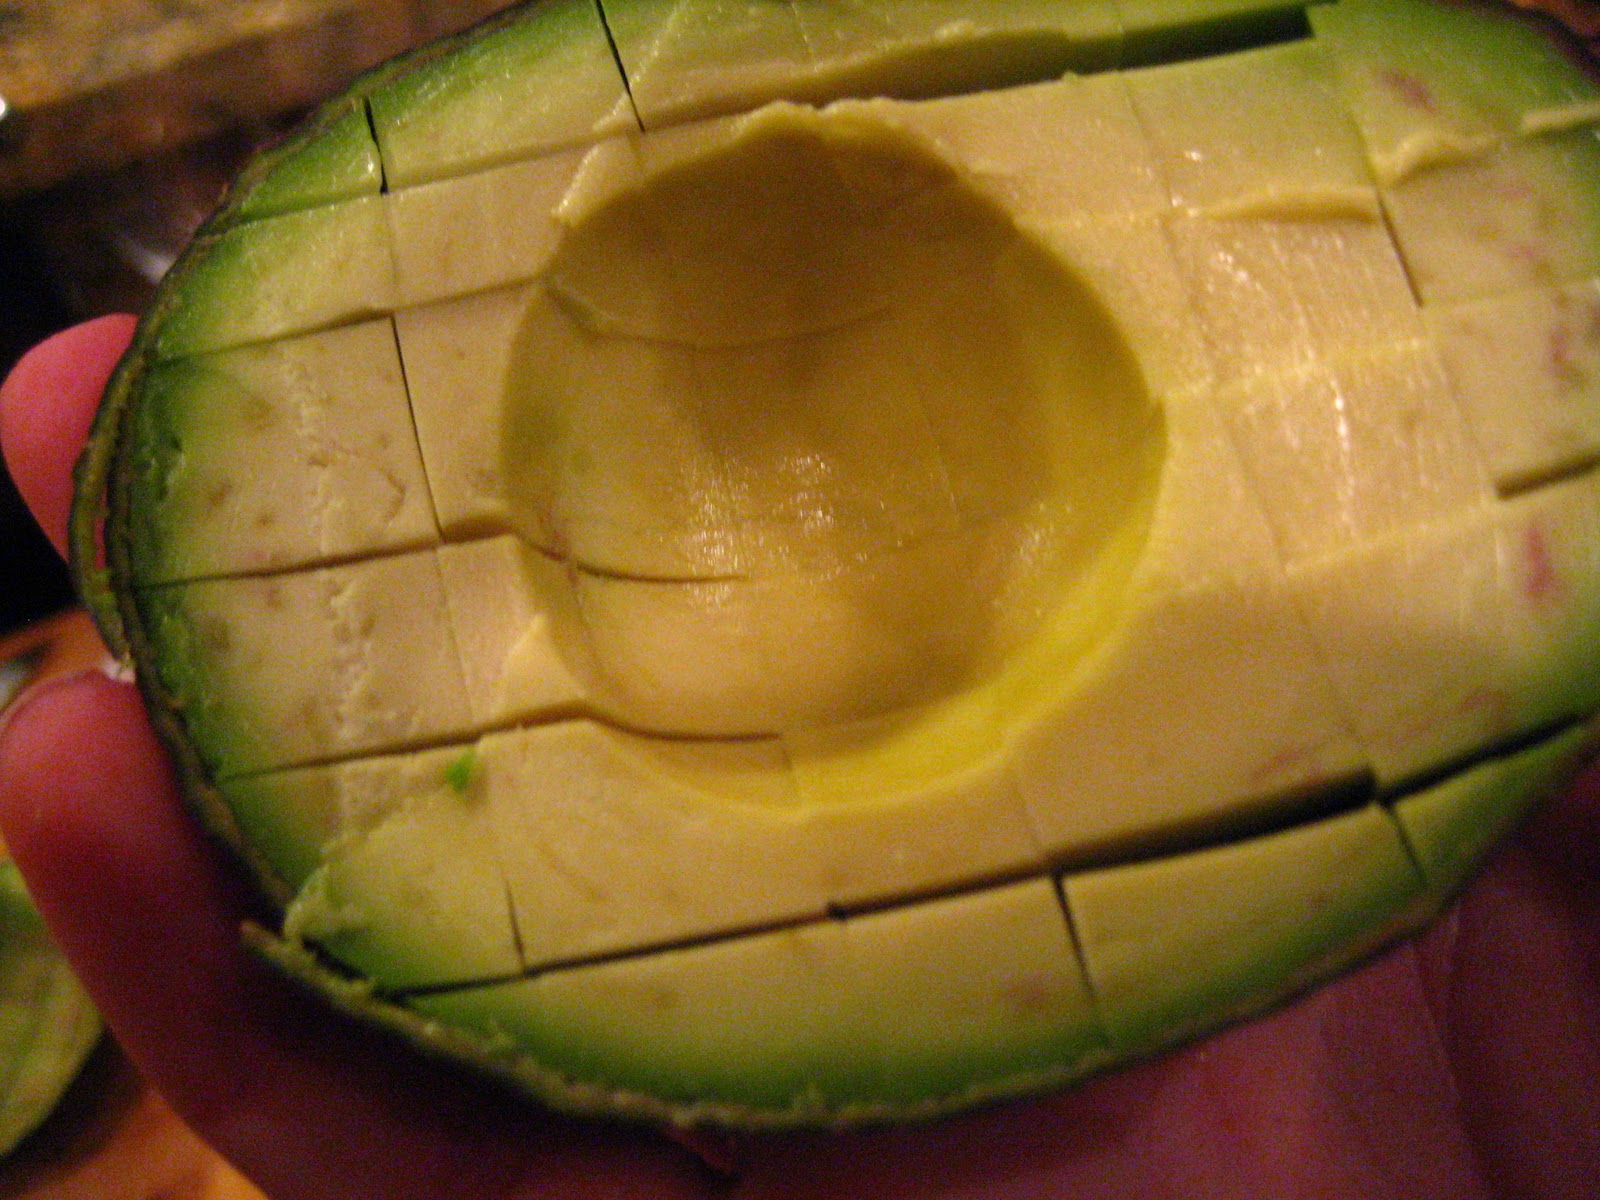
First things first...give a horizontal cut around the avocado creating two spheres.  Carefully whack your blade into the pit to remove it while leaving the fruit intack.  Then...

Run your knife in vertical cuts along the width of the avocado.  Again careful with that blade.  
Turn the avocado vertically and create another series of horizontal cuts.  Bravo you just cubed that sucker up.  Now grab a spoon and gently release those precious cubes from the skin.  No biggie if they aren't perfectly even!
Add avocado to the bowl of orange segments and juice.  Add onion, jalapeno, cilantro, and lime juice.  Stir to gently blend and add salt and pepper to taste.  


This is the finished product and can be used in oh so many satisfying ways:

(Blood) Orange ya glad you know how to make this?!?
I chose to serve mine over pan seared chicken thighs (something about the acid with the fatty crispy skin gets me).  But this would be equally as delicious over fish or you could double the batch throw in some corn, black beans, and a bit of cumin and serve it as a cold summer salad.  

Savory blood orange and avocado salsa over pan seared chicken thighs served with cumin and cilantro scented corn and black beans with green chilies, creme fraiche, and Monterey jack cheese.
Ole!


Friday, March 4, 2011

It's Recipe Friday Y'All, Gelato Edition!

We are by now all aware of my intense love of (borderline unhealthy obsession with) Nutella.  I also spent two weeks eating my body weight in Gelato as a young girl in Italy.  If you were to say combine these two things into the most holy union of all time I'm pretty sure it would be the password into heaven:

Saint Peter: Kid it looks like you had a great time down there, lots of food, lots of friends, lots and lots of questionable reality tv.  We'd love to let you in, but kid, what's the password? (I also imagine Saint Peter as a prohibition era thug in a zoot suit with a really raspy voice and a face straight out of Dick Tracey)

Me: (breathlessly) Nutella...Gelato...

(admittedly I totally stole this scenario from a dear friend...but she's absolutely right...mark her words folks...it's gonna be the password!)

And so without further ado I present to you:

The Pearly Gates' Nutella Gelato

What you'll need:
Your mise en place

2 C. whole milk
1 C. heavy cream
1/2 C. sugar, plus 1/4 C.
4 egg yolks
1/2 tsp. vanilla extract
1/2 C. Nutella


What to do:

In a saucepan combine the milk, cream and 1/2 C. sugar over medium heat.  Cook until the sugar dissolves.  Approximately 5 minutes.

Medium heat folks, we're not cooking anything just yet

Meanwhile, in a medium bowl whip the egg yolks with the remaining 1/4 C. of sugar using your trusty electric mixer until the eggs have become thick and pale yellow.  Approximately 4 minutes (this takes a bit of multi-tasking so opt for the stand mixer or recruit a friend).

Consistency of egg and sugar mixture after 4 minutes

Pour 1/2 C. of the warm milk and cream mixture into the egg mixture and stir.  This is a little process we like to call tempering.  Click here for a bit more info. on the process.

Tempering the eggs

Add this mixture back into the saucepan.

Cook over low to medium heat, stirring constantly, until the mixture becomes thick enough to coat the back of a wooden spoon (the technical term for you food geeks is nape and you are creating a creme anglaise).  Approximately 10-15 minutes.

Run your finger through the mixture,
if a line appears and remains you've reached the correct consistency

Place a strainer over a medium bowl and pour the warm custard mixture through the strainer.

Just in case that tempering was all for not and you end up with scrambled bits

Whisk in the vanilla followed by the Nutella until it dissolves.

Vanilla
Combine
Nutella

Chill mixture completely before pouring into an ice cream maker and follow manufacturer's instructions to freeze.

Patience is a virtue when waiting at the Pearly Gates!
Serve and enjoy!  I've garnished mine with a little bit of heaven called Kinder Bueno(look for more on that in the next Obsession Tuesday).

The Password! Enjoy!


Friday, February 4, 2011

It's Recipe Friday Y'All, Super Bowl Edition!

Let me start by saying you can't grow up in small town Mid-Missouri where it's all about the Friday night lights and not get a little bit excited to see the pigskin tossed around.  I've spent countless chilly Fall evenings bundled under a blanket sipping cocoa and cheering on a team with a rich tradition reaching back two centuries and boasting a winning streak that lasted from 1958-1966 (Go Jays!).

Although I don't follow professional football per se (college...of course...Go Tigers!), I do enjoy a good game, and I can't resist good water cooler talk, so a part of me tunes in for the commercials.  

But let's be honest one of the best parts about game day...the food!

Go Steelers!
Chili has always been standard fare at every football event I've ever attended...people that's a lot of beans, so I can say with some authority that chili recipes, preferences, heck chili philosophies run the gamut.  I don't claim to pledge allegiance to one form or another, as by now I'm sure you've figured out, I'm an equal opportunity eater.  I would, however, love to share with you one of my favorite versions.  I first discovered it out of necessity when my lovely neighbor began sharing the fruits of his raised bed gardening experiment.  I had a sack full of Anaheims, what's a girl to do...cut to this delicious Chili:


Roasted Anaheim and White Bean Chicken Chili

What you'll need:

1 lb. dried small white beans
8 fresh Anaheim chilies (approx. 1 pound)
1/4 C. butter (1/2 stick)
2 large yellow onions, chopped
1/3 C. all purpose flour
4 C. low-salt chicken broth
3 C. half and half
4 C. shredded cooked chicken (cheat and buy a pre-cooked rotisserie chicken, my lips are sealed)
1 Tbl. chili powder
1 Tbl. tabasco sauce
1 Tbl. ground cumin
2 tsp. salt
1/2 tsp. white peper
1 1/2 C. grated Monterey Jack cheese (approx. 6 oz.)
1 C. sour cream
Chopped fresh cilantro, for garnish

What to do:

Place beans in a heavy large pot with enough cold water to cover them by at least 3 inches and let stand overnight (generally I'm all about shortcuts, so you're probably wondering, why the dried beans.  Seriously people, this is virtually labor free, you're just soaking beans while you sleep for crying out loud!).  

Char chilies over gas flame or in broiler until blackened on all sides.  While chilies are charing shred the chicken.  Once blackened remove chilies from oven and carefully enclose in a paper bag (No bags? That's cool, try a large bowl covered tightly with plastic wrap, you're just sweating these puppies out of their skin, use any method you prefer).  Let stand 10 minutes.  Peel, seed, and chop chilies. Set Aside.  (And WASH YOUR HANDS, you don't want that heat migrating anywhere else.)


Drain Beans and return to pot.  Add enough cold water to pot to cover beans by 3 inches and simmer until the beans are almost tender, stirring occasionally, about 1 hour.  Drain well.  


Melt butter in a clean heavy large pot over medium heat.  Add onions and saute until tender, about 15 minutes.  

Add flour and stir 5 minutes (Ok ladies and gents, we are creating the beginning of a roux here, so patience is key. You don't want to brown the flour, we are shooting for a blonde roux, so stir your little hearts outs and watch that heat!)

Gradually whisk in chicken broth and half and half (slow here we don't want lumps).  Simmer gently until thickened, about 10 minutes.  Add reserved white beans and roasted chilies, shredded chicken, and the next 5 ingredients.  Simmer gently to blend flavors, about 20 minutes.  


*If you are planning on consuming the entire batch in one sitting, say at a Superbowl party, then go ahead and add grated cheese and sour cream right to the pot, stir just until cheese melts (don't let the chili boil at this point, you'll have a mess on your hands, we are just melting the cheese). 


*If you will be eating this in smaller servings throughout the week then I'd recommend leaving out the dairy and simply garnish with it.  Reheating will be much easier without the cheese and sour cream already included in the chili.

Ladle chili into bowls and garnish with cilantro (another wonderful addition is a bit of tomatillo salsa, Trader Joe's has a pretty solid version).  Serve and enjoy!


Oh and did I mention Go Steelers!?!?


Sunday, September 19, 2010

Avast me hearties! This here be a recipe to send scurvy to Davy Jones' locker.

Posted by PicasaIn honor of National Talk Like a Pirate Day, I thought I'd share with you one of the most delicious quick bread recipes in all the high seas. But first a word from our sponser:

Aunt Judy is the "tallest" pictured
the rest are under the age of six.
 My dear Aunt Judy is the mistress of quick breads and has been delighting our family with a plethora of options for as long as I can remember.  As children we knew that once we'd surpassed Aunt Judy's height (a mere 4 foot and some change, see picture for height reference) we could graduate to the adult table at family gatherings.  I'd like to think that until you've mastered Aunt Judy's quick breads you can't graduate into full on foodie.


This particular recipe is perfect for you pirates and the reason is threefold:

1. Portability; it's a quick bread, no refrigeration required and easily wrapped in butchers' paper.  Perfect for all your swashbuckling adventures.

2. Vitamin C; this recipe calls for orange juice, an antidote to the dreaded scurvy.

3. Poppy Seeds; medicinally said to help ease tooth ache, which you may need mates (see reason number 2).


And so please enjoy this recipe that just may have you yelling "Shiver me timbers!"


Aunt Judy's Poppy Seed Bread


What you'll need:

For the bread:
3 c. flour
2 ¼ c. sugar
1 tsp. salt
1 ½ tsp. baking powder
1 ½ c. milk
1 1/8 c. oil
3 eggs
1 ½ tbl. Poppy seed
1 ½ tsp. vanilla extract
1 ½ tsp. butter extract
1 ½ tsp. almond extract

For the glaze:
¾ c. sugar
¼ c. orange juice
½ tsp. vanilla extract
½ tsp. butter extract
½ tsp. almond extract

What to do:

For the bread:

Preheat oven to 350.  

Grease and flower loaf pans.  Sift into a large bowl the flour, sugar, salt, and baking powder.  Whisk in milk, oil, eggs, poppy seeds, and extracts until just combined.  I prefer to whisk by hand rather than in a mixer, over whisking will develop gluten making a tougher bread.  
Bake for 50-60 minutes (you are looking for golden brown and delicious with a clean toothpick test).

For the glaze:
While baking combine all glaze ingredients in a small sauce pot.  Heat glaze over low heat until dissolved and combined.  Once your bread is finished baking remove from the oven and pour glaze over bread and let stand for 10 minutes.  Then turn out and continue to cool on wire rack. 


This yields two loaves which is absolutely perfect.  You'll want to devour the first one on site, but the second loaf will freeze beautifully.  Cool completely and then wrap in butcher's paper.  This will easily keep for three months if packaged properly.  Just set it out on your counter overnight to thaw and you'll have the most delicious breakfast awaiting you when you rise.  

Tuesday, September 14, 2010

Recipe Friday...Tuesday edition

Ok, I know what you're thinking...don't tease me with a recipe thereby tricking my internal clock into thinking the workweek is finally over.  Sorry folks, it's Tuesday.  On the flip side you are going to love this recipe so much you'll hardly care that you have 72 more hours until the weekend...it's that good!

So why, pray-tell, you ask, have I been blessed with this early edition Recipe Friday?  Well friends because Fall is upon us and it's making me giddy with delight and visions of large batch soups and stews (perfect for the freezer, take note you busy workin' folks).  We've had the most perfectly lovely weather lately that I wanted to share this recipe early so you could procure all the necessary ingredients by the weekend, because ground lamb isn't the easiest thing to find, but it's oh so worth the hunt (no you don't actually have to hunt the lamb...it's a figure of speech people).

This recipe hails from Finland, and although I am entirely unfamiliar with what exactly the good people of Finland have contributed to this earth, (I'm sure there are plenty of spectacularly diplomatic things, I just skipped that class in college) even if they only invented this soup, it would be enough to pledge my allegiance to the Finnish flag.  I will admit, this shopping list alone doesn't exactly scream "best soup ever" but trust me this is bowl-licking-good soup.


Finnish Style Cabbage Soup

What you'll need: 

6 oz bacon, minced
9 oz ground lamb
3 oz onion, julienned
3/4 pound cabbage, chiffonade
1 1/2 oz celery, finely chopped
1 1/2 oz carrots, finely chopped
1 1/2 oz turnip, finely chopped
3/4 oz garlic, minced
3/4 tsp cracked black pepper
Salt, to taste
3 oz tomato, concasse and diced
48 oz chicken broth
dill, as needed for garnish (but it's not just pretty, it's for flavor too, so don't skip it!)
sour cream, as needed for garnish (see: dill explanation)

What to do:

Heat a large pot over medium heat and add the bacon.  Cook until the fat has rendered about half way and then add the ground lamb and onion.  Continue to cook until well browned.  Add the cabbage, celery, carrots, turnip, garlic, salt and pepper. Sauté until the cabbage has softened, but do not brown the vegetables (we want the caramelized flavor to come from the meat but the veggies to remain uninhibited, free to let their fall veggie flags fly).  Add the tomatoes* and the broth and bring to a simmer (a simmer people, NOT a boil, we don't want to cook the ever living flavor out of these veggies) and cook slowly until the veggies are tender, approximately 30 minutes.  And there you have it...it's that simple...and it's somewhere in that simplicity that I fell in love with this soup and you will too.  I'm not sure really when the lovely people of Finland partake in this soup (a lot I would imagine, as the few facts that I actually know about Finland involve its flag, which is blue with a white cross, the white of course representing all the snow) but I think it's perfect for the Fall.  It's not really hardy enough to be a rib-sticking Winter soup, but just as you begin to feel the dependable chill of September air roll in, that's the exact moment you want to have a steamy bowl of this soup in your lap (well not in your lap, but in a bowl ON your lap as you enjoy one of the last outdoor meals before Fall officially descends).

*And now a word about concasse:
Concasse is a French technique for getting all the guts and skin and seedy bits out of a tomato so that you are left only with plump tomatoey flesh.  It requires you to cut out the core end, score the other end, blanch, shock, squeeze, and peel.  In my personal opinion this is a whole lot of rigamarole for purely aesthetic purposes.  If you don't mind seeing more tomato parts in your soup, then I say skip this fussy step and just dice the stinking tomato, trust me Finland won't mind

Friday, August 27, 2010

Teaching an Old Dog

I'd like to say that although my husband came packaged with a myriad of fun accessories like witty banter, great hugs, and a soft spot for all things furry, he did not come fully equipped with the ability to cook.  As he likes to say "I can't cook but I can follow directions".  So I was particularly surprised when he offered to cook our anniversary dinner a few weeks ago.  First things first I checked the interwebs to make sure the traditional fourth year anniversary gift was not a kitchen fire (it's fruit and flowers for those of you wondering). I offered my help with this adventure but was only allowed to pick a recipe.  Oh the pressure was on.  To date, my husband was a one trick pony, if he ever offered to cook, I knew I was getting his "you won't be single for very long penne alla vodka" so imagine my surprise when he wanted me to pick a new recipe!  At last...he was adding to his arsenal.  I knew I had to keep it rather simple, just a handful of high impact ingredients, nothing fussy, and nothing that required too much knife work.  What follows is the recipe that he successfully pulled off with ease.  Please enjoy!

Creamy Fresh Pasta with Crab, Artichokes, and Mint

This is a great recipe for a busy weeknight because it has all of 5 count them 5 main ingredients, but it's elegant enough for a Sunday dinner.  I take major shortcuts with canned ingredients, but fresh pasta and mint make this dish seem like you slaved all day.  Bonus; the fresh pasta cooks in a matter of minutes so no excuses, you can feed your family swiftly and with relative ease.  So put down the phone, you won't need to order pizza tonight.  This dish easily serves a family of four especially if you add a lovely salad and some crusty bread.

What you'll need:


Kosh salt (enough to make your pasta water taste like the sea)
1 pound fresh pasta (I prefer pappardelle, but fettuccine works just as well)

4 Tbl unsalted butter (that's 1/2 a stick)
1/2 cup extra-virgin olive oil
1 can (16 oz) artichokes, drained, rinsed, and halved
1 lemon zested and juiced
Pinch of red pepper flakes
8 oz lump crabmeat (you can spring for the expensive stuff but the canned version ala chicken of the sea works just as well)
3 oz herbed goat cheese (like chevre) crumbled
Freshly ground black pepper, to taste
Salt, to taste
Handful of fresh mint leaves, chopped
3/4 cup freshly grated Parmigiano-Reggiano cheese, plus extra for serving

What to do:


Bring a large pot of salted water to a boil.  Don't add your pasta just yet.  We are seriously talking three minutes cooking time max so you'll want to start the sauce in the meantime.  Make sure you have all your ingredients preped and ready to go before you begin, once this train leaves the station you're riding it to the end of the line...no stops!

Combine the butter and olive oil in a medium skillet over medium heat.  Place pasta in boiling water and cook to package instructions.  During the cooking process scoop out 1 cup of the pasta water and add to skillet allowing the liquid to reduce around five minutes.  Don't expect the liquid to thicken a great deal, what you are making is the beginning of a burro fuso which is basically a buttery glaze for pasta made with starchy pasta water, butter, and cheese.  (A burro fuso is a great way to make a light sauce for any pasta, if you are feeling adventurous you can try all sorts of combinations like tortellini with peas and prosciutto or pumpkin ravioli with sage and guanciale.)  Once your pasta is cooked through, drain and place in a large bowl.  You can cover it with a tea towel to keep it nice and hot while the sauce is finishing.  If you are concerned about all that beautiful pasta sticking together in one large Medusa-like mass just toss it with a bit of olive oil, problem solved.  Once the liquid in the skillet has reduced add the artichokes, lemon zest, red pepper flakes, crabmeat, salt and pepper and toss to warm everything through. Remove from heat and pour over noodles and toss to combine.  Add goat cheese, mint, and Parmigiano and season with more black pepper.  Toss to combine.  The residual heat will make the cheeses melt ever so slightly and heat the mint up allowing it to release some pretty potent essential oils.  I typically toss this pasta together with my nose held very close to the bowl...it's really a smell you can't resist!  Squeeze a bit of the lemon juice over the top, just enough to brighten the flavors and really make it sing.  This is where the important task of tasting before you serve comes along.  Think it needs more acid?  Squeeze a bit more lemon.  Not peppery enough?  Well grind away.  Need a bit more saltiness?  Sprinkle more Parmigiano on top.  Just be sure to really toss well before serving, the artichoke and crab tend to slither to the bottom of the bowl and those are two major ingredients you don't want to miss out on.  This is really a no fail recipe, packed with flavor, ready in a jiffy, and easy enough for even a novice cook to master.

This recipe adapted from Tyler's Ultimate, Tyler Florence

Friday, July 23, 2010

It's Recipe Friday Y'All!

In my line of work I am often asked to share easy healthful recipes with the masses.  Well actually I'm often asked "so what's your favorite thing to cook" which has always struck me as the oddest question.  I love to cook all sorts of things, I love to bleed over into the pastry world, I love to create cocktails that pair well with my food.  I love it all, and you should, because this is a pretty thankless business.  You work like a dog and get paid like a pauper so you'd better love it...but I digress.

The truth is I love to eat the fussy stuff but I'm not so keen on slaving hours in my kitchen to create it.  I'll happily set up shop throughout the holidays, creating menus, revising menus, testing dishes, and laboring over the perfect turkey.  But unless you plan on breaking out the china I feel like elegant understated easy dishes are the way to go.  I'd love to share some of those easy dishes with you every Friday with user friendly instructions that promise great results.  Expect video tutorials once this blog goes extra fancy.  In the meantime I hope you enjoy this:

Turkey and Artichoke Stuffed Shells with Arrabbiata Sauce

This recipe is my "company is coming let's make it ahead" stand by.  With a salad and some rustic bread this can easily feed a crowd of 6-8.  But the true beauty lies in the fact that you only cook the pasta half way and finish the dish in the oven.  This allows you to stuff all those pretty little shells and toss them in the freezer.  You can pull out as few or as many as you wish! Making the bang for your buck, or in this case, meals for your time, invaluable.

What you'll need:

For the shells:
1, 12 oz box jumbo pasta shells
3 Tbl extra-virgin olive oil
1 medium yellow onion, chopped (aprox. 1 cup)
5 cloves of garlic
1 lb of ground turkey
1, 10 oz package frozen artichokes, thawed and roughly chopped
1, 15 oz container ricotta cheese
3/4 cup grated Asiago cheese
2 eggs, lightly beaten
1/4 cup chopped basil leaves
2 Tbl chopped fresh flat-leaf parsley
Salt and Pepper to taste
5 cups Arrabbiata Sauce (recipe below)
2 cups grated mozzarella

For the sauce:
2 Tbl extra-virgin olive oil
6 oz sliced pancetta, roughly chopped (bacon works in a pinch or if you're just pinching pennies)
2 tsp crushed red pepper flakes
3 garlic cloves, minced
5 cups of your favorite marinara sauce

What to do:

For the sauce:

You'll want to make this sauce ahead of time and allow it to cool.  However, if you're pulling these puppies out piecemeal (pun totally intended) then I say skip making your own sauce all together.  Just grab your favorite marinara and go to town.  You may even get lucky and find a jarred Arrabbiata already ready already (Trader Joe's makes a pretty tasty one).  You'll hardly miss the jazzed up version.  I only bother with it when I know I'm going to be baking off all the shells at once. If you hate the idea of sacrificing a crispy pork product lingering somewhere in your dish then cook up the pancetta with your turkey and stuff it into the shells.  If you do plan on making the sauce, here's what ya do:

Heat the olive oil in a large pot on medium heat.  Add the pancetta and sauté until golden brown (if you are using bacon take it to a medium crispness) somewhere around five minutes of cooking time.  Add the garlic and saute until tender, make sure you are only using medium heat, as this process goes quickly and if you burn the garlic there's really no going back.  Add the marinara sauce and red pepper flakes and bring to a simmer.  Remove from heat and let cool until ready to use.

For the shells:

Bring a large pot of salted water to a boil.  Add the pasta and partially cook just until pliable but still very firm to the bite, approx 4-5 minutes.  Drain the pasta and rinse under cool water to stop the cooking process.  Set aside on a cookie sheet to cool, with the shells separated so as not to stick together.

Meanwhile, in a large skillet, heat the olive oil over medium-high heat.  Add the onions and the garlic and cook until the onions are soft and beginning to brown.  Add the ground turkey and continue to cook, stirring occasionally, until the meat is slightly golden and cooked through.  Add the artichoke hearts and stir to combine.  Remove from heat and allow mixture to cool.  *Don't cheat here, allow it to cool, if you combine hot off the stove meat with the cheeses and egg you run the risk of curdling the egg and making a gooey mess of the cheese.*

In a large bowl combine the ricoatta cheese, Asiago cheese, slightly beaten eggs, basil, parsley, and salt and pepper to taste.  Stir to combine.  Then add the cooled turkey mixture and again stir to combine.

Cover the bottom of a 9 X 13 X 2 baking dish with 1 cup of sauce (this will prevent sticking).  To stuff the shells take a shell in the palm of your hand and stuff it with a large spoonful of the turkey mixture.  Repeat, and align the stuffed shells in the baking dish until full (approx 24 shells).  Cover shells with remaining sauce (these measurements can all be eyeballed if you are cooking only a few shells at a time) and top with mozzarella.

To bake, preheat the oven to 400 degrees.  Bake until the shells are warmed through and the cheese is beginning to brown approx 20 min. If the shells are frozen no need to thaw simply cook them longer approx 60 minutes.

Stuffed shells can be frozen sans sauce on a cookie sheet so as to prevent sticking.  Once frozen seal tightly in a plastic bag for up to 1 month.

This recipe adapted from Giada De Laurentiis, Everyday Italian